Study smarter, crush harder — enjoy the grind the clever way.
Most players who dabble with solvers like GTO Wizard can memorise basic opening ranges. But when it comes to calls and 3-bets, especially across different positions and stack depths, everything starts to fall apart.
So what’s going wrong?
The problem isn’t with the charts – it’s how we study them. If you try to memorise without understanding, your brain simply won’t retain the information. It becomes fragile knowledge, and under pressure, it breaks.
In this article, we’ll show you how to truly internalise GTO strategy – focusing on Ax hands as a starting point – and how to build practical knowledge you can use at the table.
Part 1: Understanding Ax Hands from GTO Perspective
Let’s analyse how different ace-x (Ax) hands are treated in GTO ranges using a 60bb stack depth from the UTG1 position (early position in tournaments). We’ll cover opening decisions, 3-bet considerations, and the logic behind each.
Quick GTO Summary: UTG1 Ax Hands (60bb MTT)
| Ax CATEGORY | GTO ACTION |
|---|---|
| Premium (AK, AQ) | Always Raise |
| Strong (AJ-AT, A5s-A2s) | Mixed Raise/Fold |
| Marginal (A9-A2 offsuit) | Always Fold |
| Suited Mid/Low (A9s-A6s) | Mostly Fold |

Offsuit Ax Hands (AJo, ATo and weaker)
- AJo, ATo – Mixed: Raise sometimes, fold often
- A9o and below – Pure folds
Why?
- Offsuit aces with weak kickers get dominated post-flop and perform poorly vs. calls and 3-bets.
- From UTG1, you need hands that can withstand pressure from six players behind you.
- Blocker value helps, but playability matters more at this stack depth.
Suited Ax Hands
- A5s-A2s – Mix raise/fold
- A6s-A9s – Mostly fold
- ATs+ – Always raise
Why the split?
- A5s-A2s have hidden value: wheel potential and great blockers. They’re excellent bluff tools – just not from early position.
- A6s-A9s lack both draw strength and kicker quality, making them tough to play when called.
- ATs+ hold their own against calling ranges and provide robust post-flop options.
Premium Ax (AK, AQ, AJ)
- AKs, AKo, AQs, AQo – Always open
- AJs – Always or near-always open
- AJo – Mix, depending on dynamics
Why?
These hands dominate calling ranges, cover many board types, and can withstand 3-bets. They’re the backbone of early position value ranges.
Key Concepts Behind GTO Ax Decisions
| Concept | What it means |
|---|---|
| Position Awareness | UTG1 opens into the whole table. You need stronger hands. |
| Blocker Value | Ax blocks AA, AK, AQ – useful for balancing bluff ranges. |
| Playability | Suited hands can make flushes/straights – much more flexible. |
| Equity Realization | Offsuit aces struggle post-flop, especially out of position. |
| Stack Sensitivity | At 60bb, dominated Ax hands can lose big pots. |
What About 3-Betting Ax from UTG1?
From UTG1, you’re typically not 3-betting – you’re the initial raiser. But let’s also examine:
- Which Ax hands to open
- Which Ax hands to 3-bet if facing an EP open
GTO Open Range for Ax from UTG1
| Hand | GTO Action | Why |
|---|---|---|
| AKs, AK | Always open | Strongest Ax hands with top blocker/value |
| AQs, AQ | Always open | High equity, good reverse implied odds protection |
| AJ | Pure open | Dominates calling ranges; plays well multiway |
| ATs | Open or mix | Suited version allows more equity, decent vs calls |
| AJo | Mix/fold | Offsuit version struggles vs 3-bets & flops |
| A9s–A2s | Fold | Not strong enough to open from EP |
| Ax offsuit (A9o–A2o) | Always fold | Reverse implied odds, no playability |
From UTG1, your range should be linear and tight. You’re opening into the full table, so bluff combos (like A5s) that are 3-bet tools elsewhere are folded here.
Ax Hands to 3-Bet from UTG1 (Facing an EP Open from UTG)
| Hand | 3-Bet? | Notes |
|---|---|---|
| AKs, AKo | Pure 3-bet | Standard value |
| AQs, AQo | Mix or call | Mix between flat and 3-bet |
| AJs | Rarely 3-bet | Mostly a flat or fold depending on opener |
| A5s–A2s | Never | Not used as bluffs in EP vs EP dynamics |
| Ax offsuit | Never | Too weak and exposed in early vs early aggression |
Concept Summary: UTG1 and Ax Hands
| Category | Recommendation |
|---|---|
| Open for Value | AKo, AKs, AQs, AQo, AJs, ATs |
| Avoid Opening | AJo-, A9s-A2s, All Axo |
| 3-Bet (Value Only) | AKs, AKo – rarely anything else |
| 3-Bet Bluff | Not used from UTG1 – save for BTN/SB/BB |
Why This Matters
- From UTG1, your fold equity is lower and risk is higher.
- Opening or 3-betting speculative Ax hands (like A5s) exposes you to domination, especially from tight EP calling/3-betting ranges.
- GTO tightly constrains Ax usage in early position to value-heavy combos only.
In UTG1, Ax hands are weapons only when they carry top-kicker power or suited strength. If your ace lacks either, you’re better off folding and saving chips for better spots.
Now to deepen your understanding, try applying the same process to Kx, Qx, and Jx hands – break down how they appear in open, call, and 3-bet ranges across positions, and focus on why certain combos are included or excluded based on blockers, playability, and equity realisation.
Next I’d like to show you how I analyse other positions response to an EP raise – starting with the LJ facing a raise from UTG and a call from UTG1

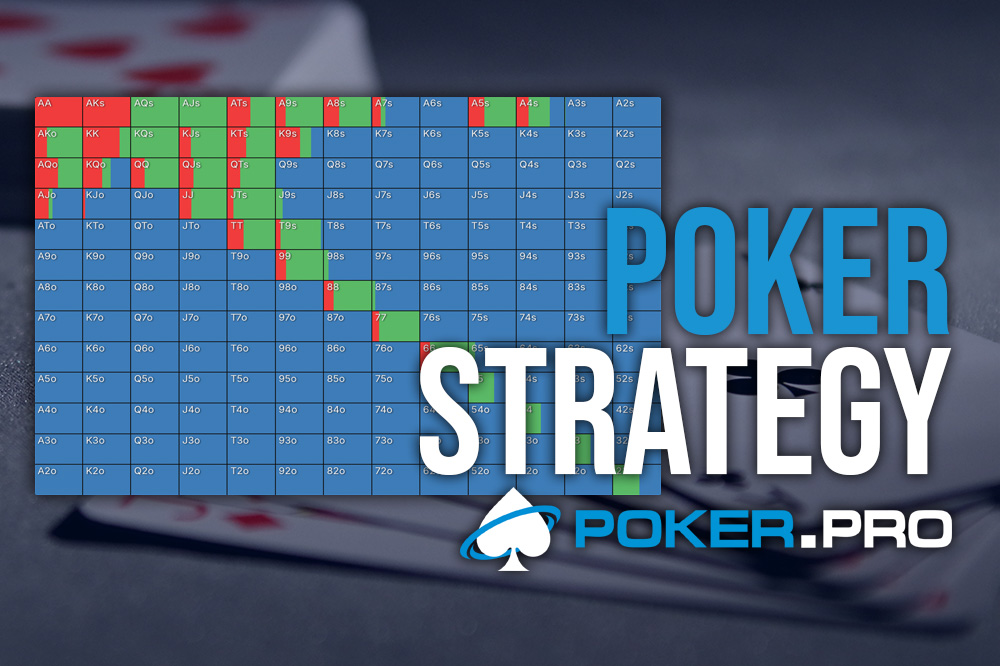
Overview of the LJ Range
This is the LJ’s decision after:
- UTG raises to 2.3bb
- UTG1 calls
- Action is on LJ (you)
So you’re facing:
- A raise and a cold call, and you’re not closing the action as there players still to act after you.
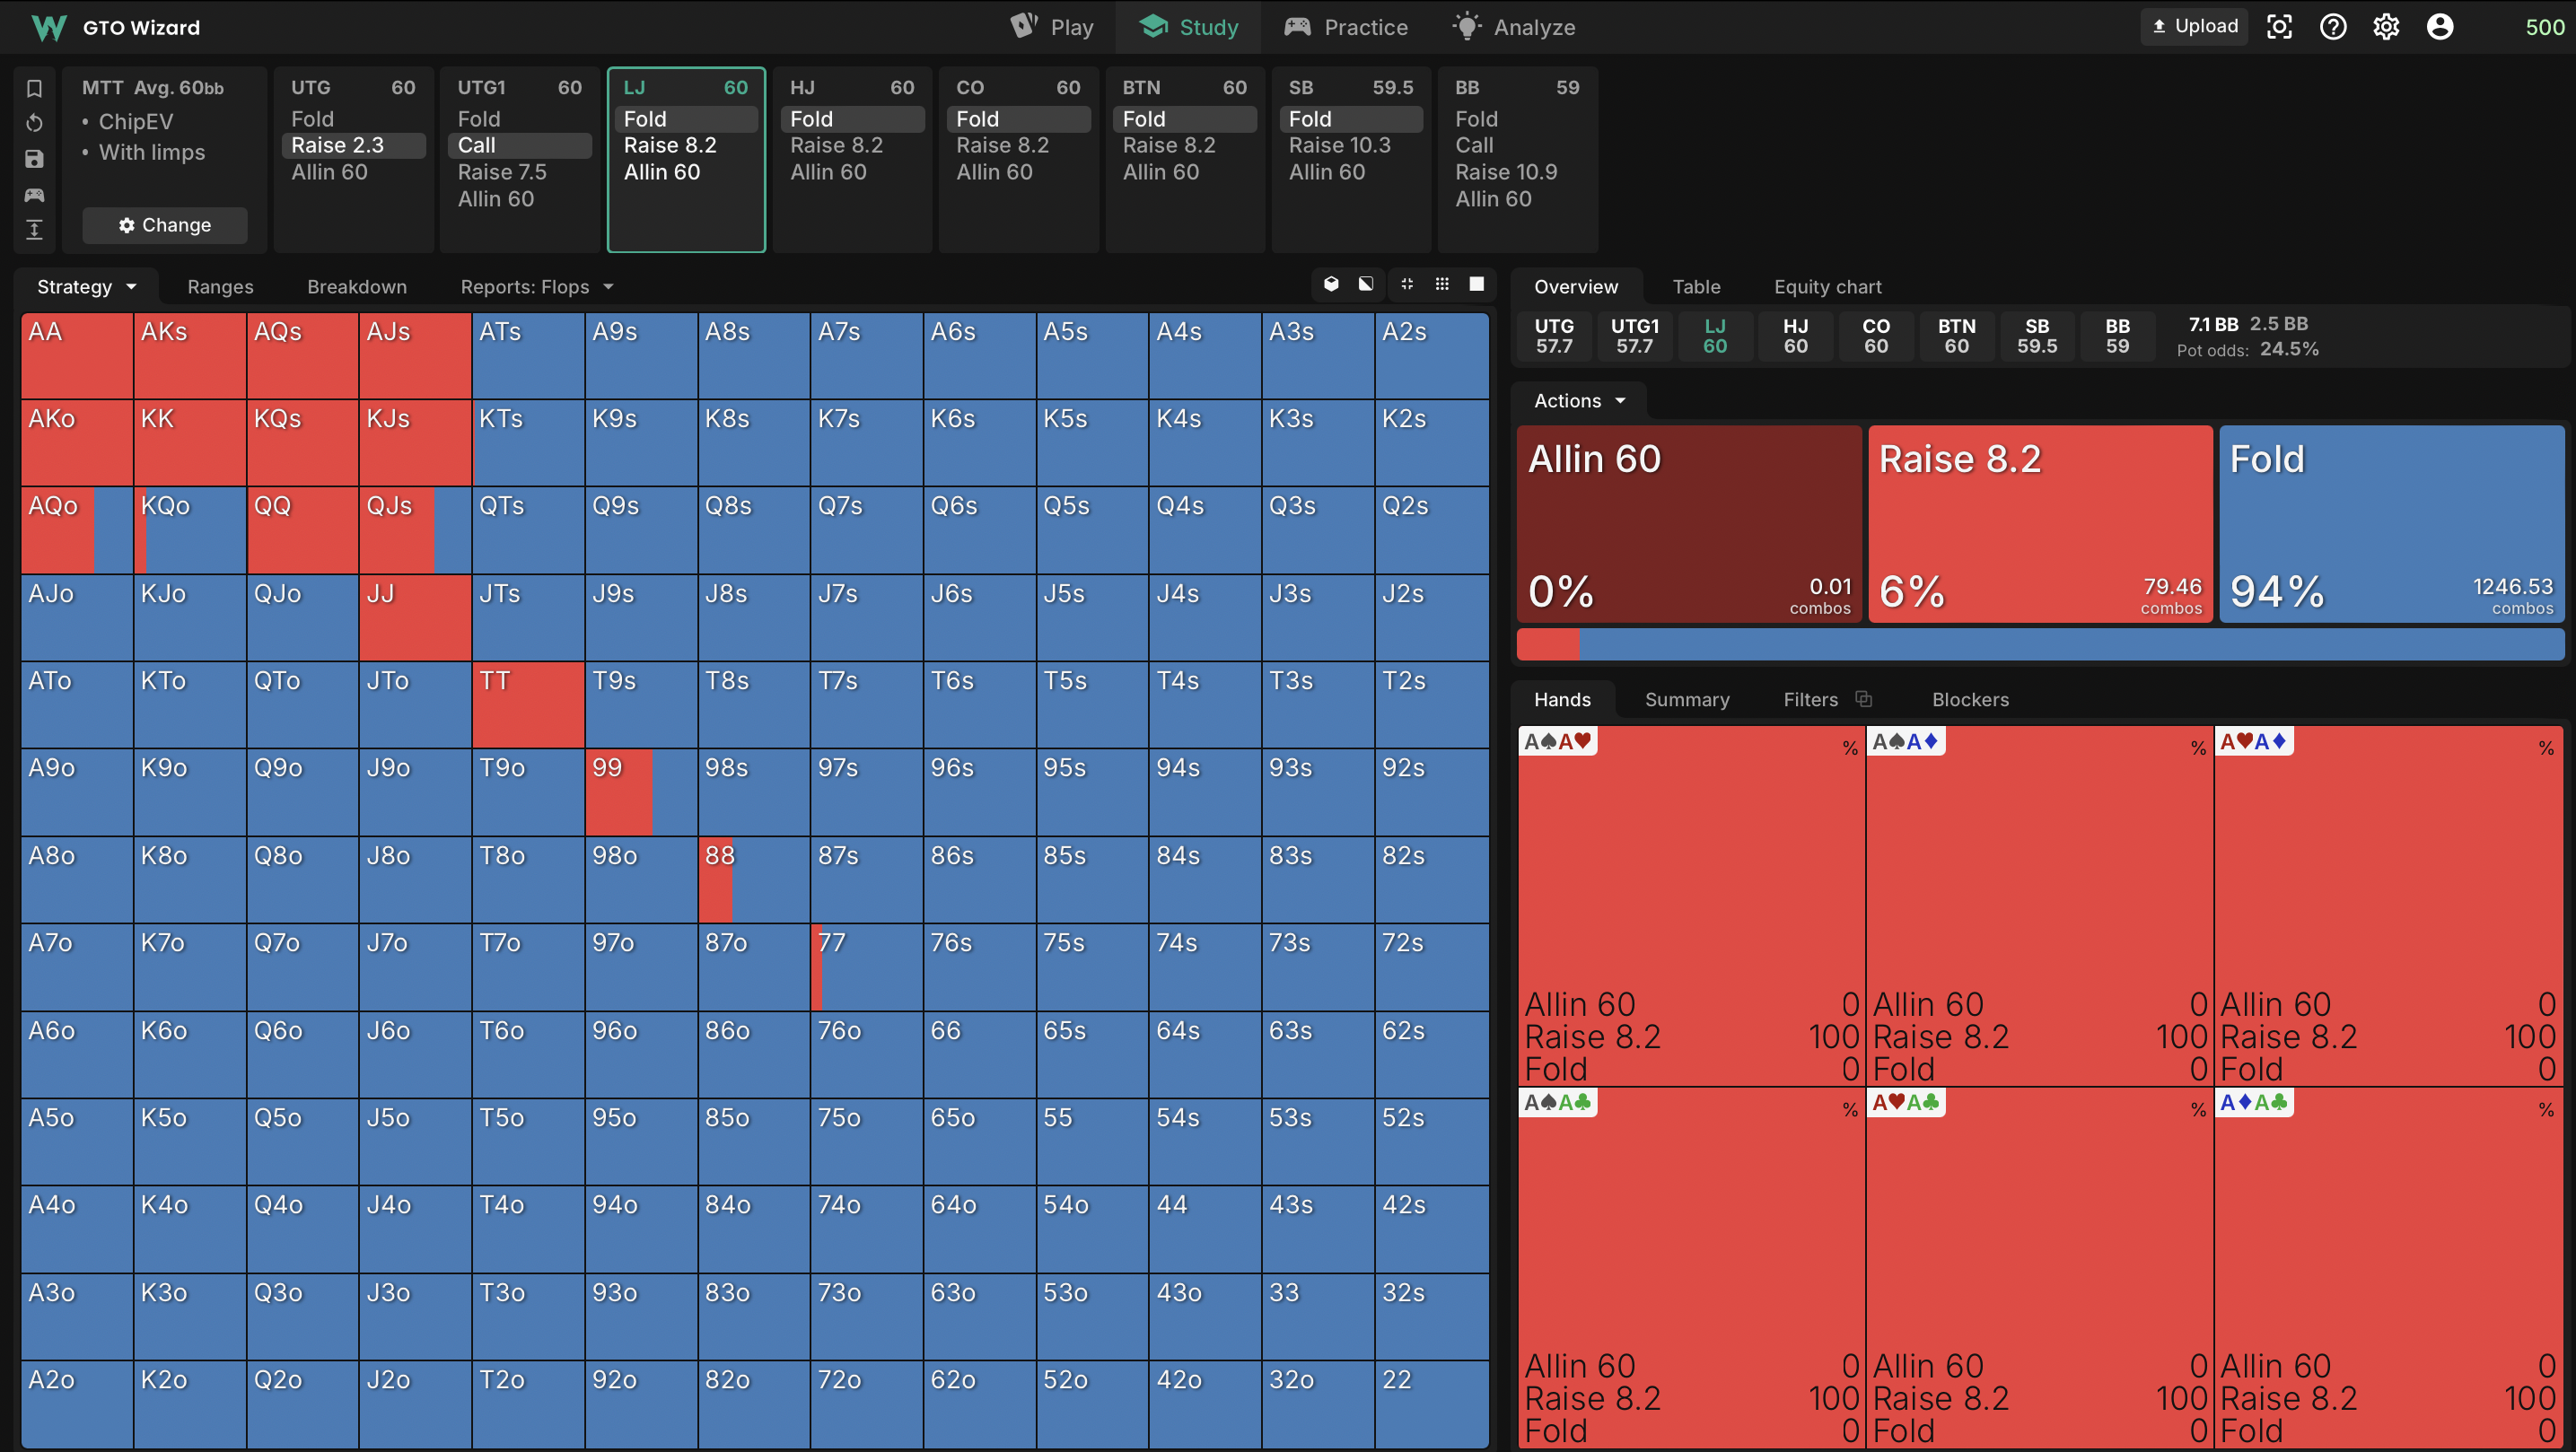
Fold (94% of hands – blue):
- The vast majority of hands are folding because:
- You’re out of position vs many players.
- Facing both a raise and a call.
- Strong ranges ahead of you UTG/UTG1 calling implies strength.
Raise 8.2bb (6% – red):
- Hands like AA–TT, AKo, AKs, AQs, AJs, KQs, QQ, AQo, etc.
- These hands are used as value raises, applying pressure.
- This sizing is chosen to punish weaker cold calls and isolate the raiser.
All-in (negligible % – brown-red):
- Practically unused here (e.g., a tiny fraction of combos of AA).
- The solver prefers non-all-in raises over shoving here to keep more of your range playable.
Why There Is No Call Option
The GTO solution does not include calling for LJ in this spot because:
1. You’re Not Closing the Action
- There are still players left to act (HJ, CO, BTN, SB, BB).
- If you call here, you risk a squeeze behind you.
- GTO tends to avoid passive play in multi-way, non-closing spots.
2. GTO Prefers Polarised Actions Here
- Solver wants you to fold weak hands, raise strong ones, and avoid middling hands that don’t play well multi-way and out of position.
- Calling is often not incentivised unless:
- You’re in late position or
- You’re closing the action.
3. Positional Disadvantage
- If you call, you’re out of position to most players behind and the initial raiser.
- GTO dislikes flatting out of position in multi-way pots without strong reasons.
In conclusion, the LJ’s strategy facing a raise and a cold call is highly selective – favouring folds with most hands and aggressive raises with strong holdings – while completely avoiding calls due to positional disadvantage, multi-way risks, and the potential for squeezes, all aligning with GTO’s preference for clarity and leverage in such spots.
Conclusion
To truly benefit from GTO study, it’s essential not just to memorise charts but to understand the why behind each decision – factors like position, action before you, and player tendencies. Focus on recognising patterns, using tools like GTO Wizard to explore different spots, and always ask “What is the solver trying to accomplish here?” With consistent, thoughtful study, you’ll develop instincts that align with optimal play and give you a strategic edge in every session.